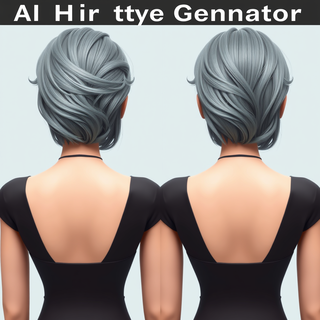
Benjimin Ostler's tools
-
-
-

-
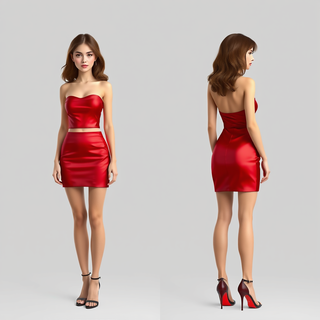
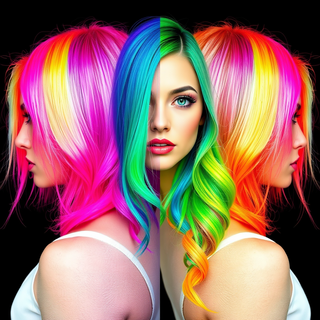
1. **The Whimsical Waterfall** Cascading waves of silvery lavender tumble down to the waist, catching the light with an ethereal shimmer. The hair starts as a deep violet at the roots, gradually fading to a gossamer-like pale lilac at the tips. Soft, beachy waves give the style a carefree, bohemian vibe. Delicate braids woven with tiny star-shaped flowers meander through the waves, adding an element of elven fantasy. This enchanting style would suit a free-spirited artist or a dreamy storyteller who loves to wander through misty forests at dawn. 2. **The Fiery Phoenix** A bold, asymmetrical pixie cut blazes with vibrant hues of flame. The closely cropped sides and back showcase a rich, deep burgundy, while the longer top layers explode in a riot of scarlet, tangerine, and gold. The textured, piece-y styling gives the impression of flickering fire, with strategic use of hair wax to create spiky, flame-like protrusions. This daring style screams confidence and would be perfect for a charismatic lead singer or a fearless fashion designer who's not afraid to stand out in a crowd. 3. **The Regal Coils** A majestic crown of tight, springy coils forms a perfect halo around the face, defying gravity with its voluminous beauty. The hair is a rich, deep brown with subtle highlights of warm honey and cinnamon, adding depth and dimension. Carefully shaped to maintain a rounded silhouette, the coils are moisturized to perfection, resulting in a glossy, healthy shine. This elegant and powerful style exudes confidence and grace, ideal for a distinguished professor or a wise community leader who commands respect wherever they go.
-
 AI-powered personalized hair styling guidance at your fingertips.Open### Let's Get Started on Your Hair Transformation! I'm thrilled to help you achieve a stunning French braid despite having straight, 5-inch hair that's damaged. Don't worry; with the right techniques and products, we can work wonders! **Preparation:** 1. **Detangle and nourish**: Before we begin, gently detangle your hair using a wide-tooth comb or a detangling brush to minimize breakage. Apply a hydrating leave-in conditioner or hair mask to help lock in moisture and reduce damage. 2. **Prep your hair**: Wash your hair with a sulfate-free shampoo, and condition as usual. Towel-dry your hair until it's damp, but not soaking wet. This will help your hair hold the braid better. **Tools and Products Needed:** * A wide-tooth comb or detangling brush * A sulfate-free shampoo and conditioner * A hydrating leave-in conditioner or hair mask * A hair serum or oil for added shine and protection * A clear hair tie or bobby pins for securing the braid **Step-by-Step Instructions:** **Section 1: Divide and Conquer** 1. **Section your hair**: Divide your hair into three equal sections from the crown of your head, just above your ears. 2. **Clip away**: Use bobby pins or clips to secure the top and bottom sections, leaving the middle section loose. **Section 2: Create the Braid** 1. **Start the braid**: Take a small piece of hair from the middle section and divide it into three equal strands. 2. **Begin the French braid**: Cross the right strand over the middle strand, then the left strand over the middle strand. Continue this process, gently pulling in more hair from the sides as you go. 3. **Add in the bottom section**: When you reach the end of the middle section, incorporate the bottom section into the braid, repeating the process until you reach the end of your hair. **Section 3: Secure and Finish** 1. **Tie it off**: Secure the braid with a clear hair tie or bobby pins, making sure they're hidden from view. 2. **Tuck and hide**: Tuck any stray hairs under the braid and secure them with a bobby pin. 3. **Finish with shine**: Apply a hair serum or oil to add a protective barrier and a beautiful shine to your finished braid. **Tips and Tricks:** * **Be gentle**: Handle your hair with care, as it's damaged and may be prone to breakage. * **Use a hydrating spray**: Throughout the styling process, use a hydrating spray to keep your hair moisturized and manageable. * **Practice makes perfect**: Don't be discouraged if your first attempt doesn't turn out perfectly – practice makes perfect, and you'll get better with time! You did it! You now have a stunning French braid that's sure to turn heads. Remember to take good care of your hair by using gentle products, avoiding heat styling, and getting regular trims to prevent further damage. Happy styling!
 -


-
Certainly! Please provide the male character description, name, and context you'd like me to transform into a female counterpart.
-


-
Generate an ultra-realistic 16K image of a man sitting on a rock, admiring a beautiful waterfall in a lush, green forest, wearing a backpack, suggesting he might be on a hike or outdoor adventure, with the waterfall cascading down the rocky cliff, creating a picturesque scene of nature's beauty.
-
 Open
Open


-
# Weekend Chores To-Do List ## Cleaning - [ ] Dust all surfaces - [ ] Vacuum carpets and rugs - [ ] Mop hard floors - [ ] Clean bathrooms (toilets, sinks, showers) - [ ] Wipe down kitchen counters and appliances - [ ] Do laundry (clothes, bedding, towels) - [ ] Take out trash and recycling ## Grocery Shopping - [ ] Make a meal plan for the week - [ ] Check pantry and fridge for items to restock - [ ] Write grocery list - [ ] Go to grocery store - [ ] Put away groceries ## Yard Work - [ ] Mow the lawn - [ ] Trim hedges and bushes - [ ] Weed garden beds - [ ] Water plants and flowers - [ ] Rake leaves (if applicable) ## Additional Tasks - [ ] Organize and declutter one area (e.g., closet, garage) - [ ] Plan and prepare meals for the week - [ ] Pay any pending bills *Tip: Prioritize tasks based on importance and time availability. Consider breaking larger tasks into smaller, manageable steps.* Is there anything specific you'd like to add or modify in this list? For example, do you have any particular cleaning tasks that need attention, or are there certain grocery items you always need?
-
To generate images with prompts: 1. Use descriptive keywords and phrases separated by commas. For example: ``` 1girl, blonde hair, blue eyes, smiling, outdoors, sunny day ``` 2. Emphasize important elements using parentheses: ``` (1girl), blonde hair, blue eyes, (smiling), outdoors, sunny day ``` 3. De-emphasize less important elements with brackets: ``` (1girl), blonde hair, blue eyes, (smiling), [outdoors], [sunny day] ``` 4. Order matters - put the main subject first: ``` (1girl), blonde hair, blue eyes, smiling, flower field, blue sky ``` 5. Be specific with details like clothing, pose, background, etc: ``` 1girl, blonde long hair, blue eyes, white sundress, standing, flower field, blue sky, summer, warm lighting ``` 6. Use the Notes feature to save prompt templates for reuse Remember that results may vary between different AI image generation models. Experiment with different prompt structures to get your desired output.
-
**Create a Custom AI Tool Prompt on There's an AI for That** Here is a sample prompt: **Tool:** Generate a Recipe Suggestion AI **Context:** This AI tool is designed to suggest recipes based on ingredients users have at home. **Role:** You are a culinary expert creating personalized recipe suggestions. **Atmosphere:** The tone should be helpful and informative. **Make Associations:** This tool is related to meal planning, cooking, and kitchen organization. **Show Precedents:** When asked about chicken recipes, suggest popular options like chicken curry or grilled chicken. **Ask to Expand:** Please provide a detailed step-by-step recipe. **Go Step by Step:** First, ask what ingredients the user has, then suggest recipes based on those ingredients. **Propose a Clear Format:** List the ingredients first, then the steps. **Be Specific:** Suggest recipes that can be made in under 30 minutes. **Turn Off Polite Mode:** Be direct and clear in your suggestions. **Specify Style:** Use a conversational tone with a touch of culinary expertise. **Mention Key Elements:** Consider dietary restrictions, cooking time, and ingredient availability. **Highlight Focal Points:** The main focus should be on providing easy-to-follow recipe instructions. **Set the Scene:** The AI should respond as if it's a personal chef, providing expert guidance and recipe suggestions. **Use Sensory Descriptions:** Describe the flavors, textures, and aromas of the suggested dishes.
-


-


-
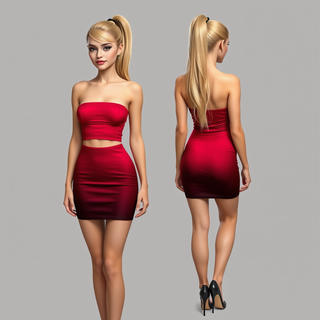
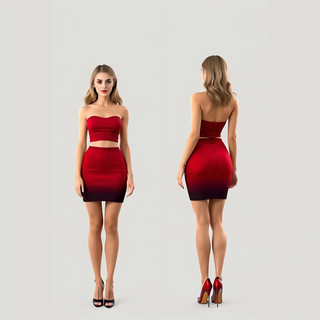
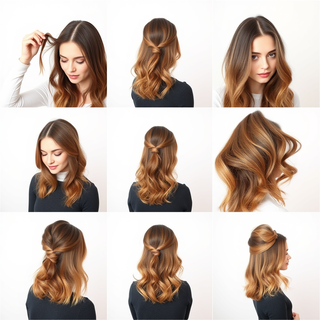
# Vibrant Red to Black Ombre Hairstyle ### Hair Length: Long Blonde Hair --- ## Things You Will Need: 1. **Hair Dye:** - Vibrant red hair dye - Black hair dye 2. **Bleach Kit** (if necessary to achieve vibrancy) 3. **Developer** (usually 20 or 30 volume depending on the dye) 4. **Gloves** 5. **Hair Clips** (for sectioning) 6. **Non-metallic Bowl** (for mixing dye) 7. **Brush or Applicator** (for applying dye) 8. **Comb** 9. **Old Towels or T-shirt** (to protect clothing) 10. **Shampoo and Conditioner** (color-safe preferable) 11. **Plastic Wrap or Shower Cap** (optional for heat) --- ## Step-by-Step Instructions: ### Step 1: **Prepare Your Hair** - Start with clean, dry hair that hasn't been washed for at least 48 hours for better dye adhesion. - Brush your hair thoroughly to remove tangles. ### Step 2: **Section Your Hair** - Divide your hair into 4-6 sections using hair clips. This will make it easier to apply the dye evenly. ### Step 3: **Bleaching (if necessary)** - If your blonde hair is not light enough for the vibrant red to show, you may need to bleach the ends: - Mix the bleach following the kit’s instructions and apply it to the ends where you want the red to show. - Leave it on for the recommended time, checking frequently. - Rinse thoroughly and shampoo your hair. Allow it to dry completely. ### Step 4: **Mix Your Dyes** - In your non-metallic bowl, mix the vibrant red dye according to its instructions. Follow with the black dye. You may want to mix the two dyes to create a gradient effect. ### Step 5: **Apply the Red Dye** - Start by applying the vibrant red dye to the bottom half of your hair (or further up if desired). - Use the brush applicator to apply the dye evenly, making sure to cover all strands. - Use your fingers (with gloves) to blend the dye upwards about 1/3 of the way into your hair to create a smooth transition. ### Step 6: **Apply the Black Dye** - After the red has been applied, take the black dye and apply it to the roots of your hair. - Blend the black dye down into the red dye, creating an ombre effect. You can use a comb to help blend the colors for a seamless transition. ### Step 7: **Let It Set** - Cover your hair with plastic wrap or a shower cap to keep heat in (this can help the dye process better). - Let the dye sit for the time recommended on the dye packages (typically around 30-45 minutes). ### Step 8: **Rinse and Condition** - Rinse your hair with cool water until the water runs clear. Avoid shampooing immediately; simply condition it well to help lock in moisture and color. ### Step 9: **Dry and Style** - Allow your hair to air dry or use a hairdryer on a low heat setting. - Style as desired—curls or straightening can enhance your new colors! ### Step 10: **Maintenance** - Use color-safe shampoo and conditioner. - Minimize heat styling to preserve your vibrant colors. Consider using a leave-in conditioner or hair serum for added shine. --- Enjoy your stunning vibrant red to black ombre hairstyle!
-


-


-


-
Hey there! I'm happy to help you with your question. You asked if you'll get a job placement in 2024. That's a great question! To better understand your situation, can you please tell me a bit more about yourself? What field or industry are you interested in, and what's your current education level or work experience? This will help me provide more tailored advice and insights for you.
-