
Autocodeagent2 0
AutoCodeAgent - An innovative AI agent powered by IntelliChain, Deep Search, and multi-RAG techniques
README
AutoCodeAgent - An innovative AI agent powered by IntelliChain, Deep Search, multi-RAG and Reinforcement Learning.
Learn by Doing: Bridging Theory and Practice
This repository was primarily created as a learning tool. It allows you to explore and understand the core concepts behind advanced AI features like IntelliChain, Deep Search, and Multi-RAG through dedicated Jupyter Notebook files (.ipynb). These notebooks clearly explain the underlying theory. You can then see these very concepts applied directly within the working code of the AutoCodeAgent project. This approach is highly effective for learning because it bridges the gap between theoretical understanding and practical implementation, enabling you to see how and why things work in a real-world application context.
From the Creator
I'm Samuele Giampieri, an AI Engineer captivated by the frontier of agentic AI. Why this repository? Because I believe the best way to truly grasp the power of technologies like IntelliChain, Deep Search, and Multi-RAG is to build with them. AutoCodeAgent is my personal deep dive—a place where I transform complex theory into tangible, working code.
But this journey isn't just for me. I've crafted this project as an open resource, hoping it serves as both a practical guide and a source of inspiration for fellow developers navigating the exciting landscape of AI. My goal is to contribute something valuable back to the community that fuels my passion.
I genuinely hope AutoCodeAgent proves useful in your own development adventures. Please feel free to connect—I'm always eager to discuss ideas, share insights, and learn alongside you!
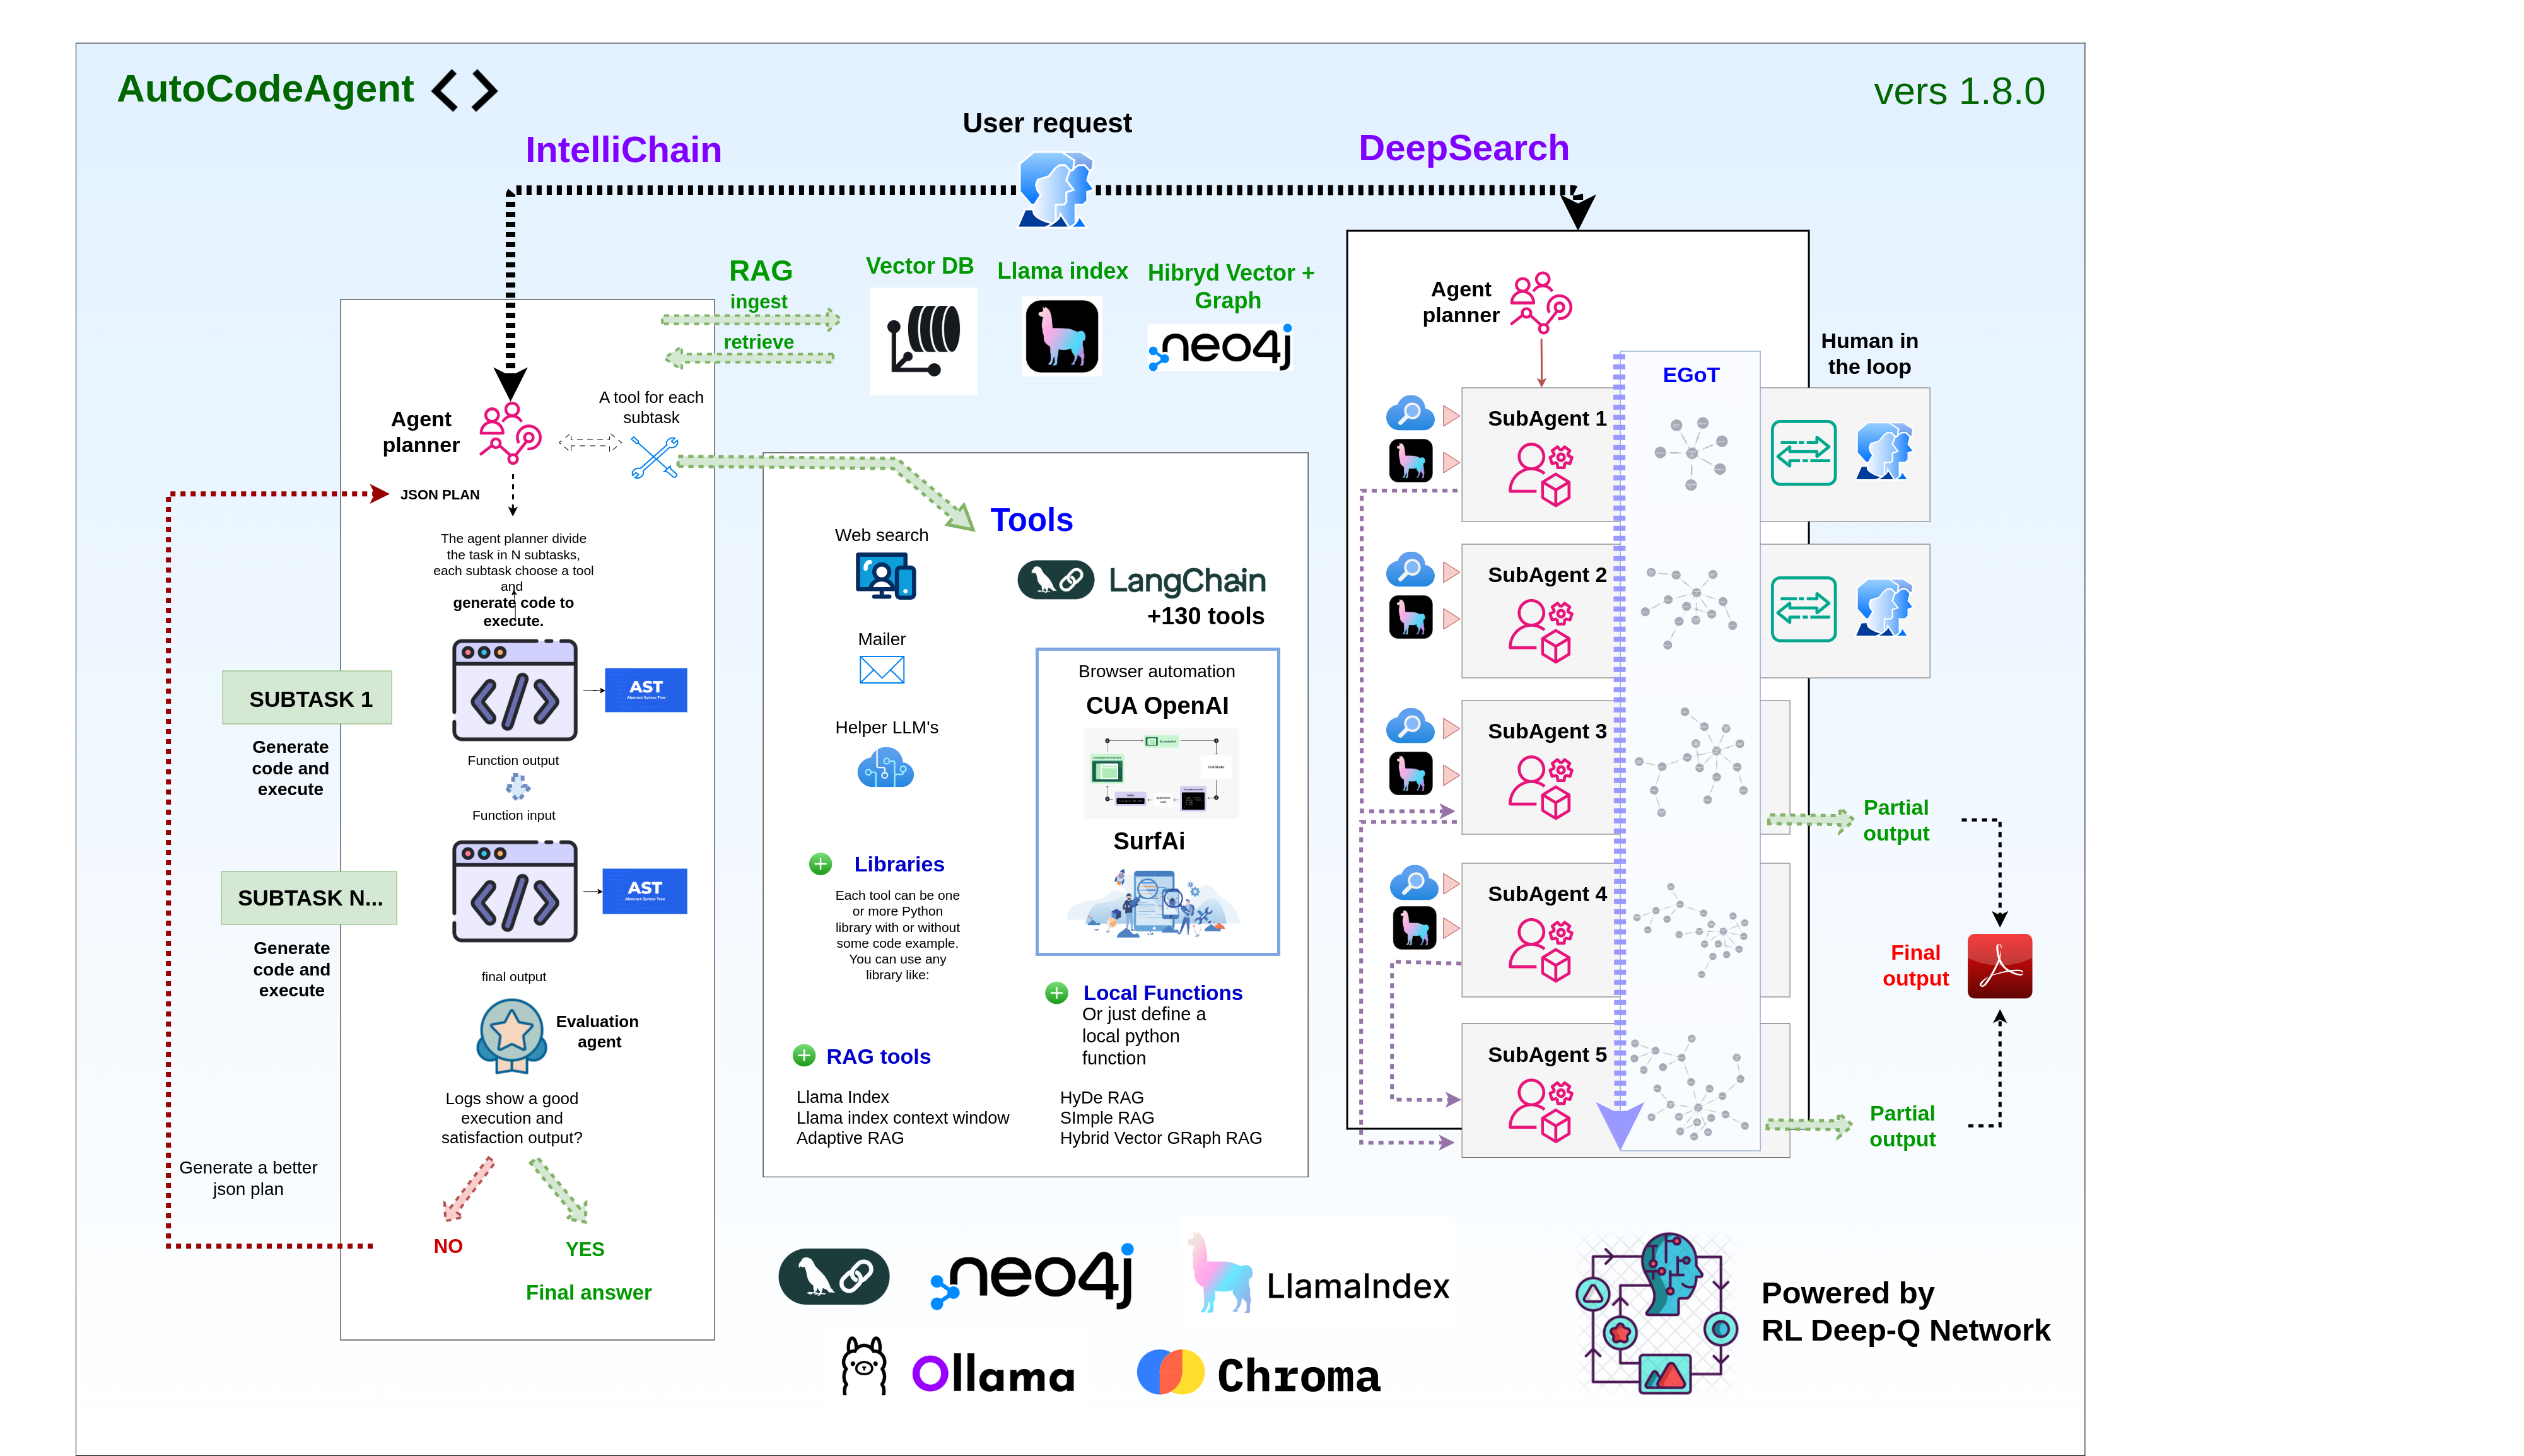
IntelliChain
Break down complex tasks with surgical precision through dynamic task decomposition and on-demand code generation. IntelliChain meticulously plans and executes subtasks, ensuring every step of the process is both targeted and efficient.
Deep Search
Harness the power of autonomous, real-time web research to extract the most current and comprehensive information. Deep Search navigates diverse online sources, transforming raw data into actionable intelligence with minimal human intervention.
Multi-RAG
Enhance information retrieval through an innovative multi-RAG framework that includes many different RAG techniques. This multi-faceted approach delivers contextually rich, accurate, and coherent results, even when working with varied document types and complex knowledge structures. The incredible innovation is that these RAG techniques have been implemented as tools, so they can be used like any other tool in the project.
You can also benefit from these techniques for educational purposes, as each one is conceptually well-explained in the .ipynb files located in the folders within /tools/rag.
Deep Q-Network (DQN) Learning from Experience
For those interested in Reinforcement Learning, the project also includes an implementation of a QLearningAgent, detailed in notebook. This agent can operate in two modes:
- Simple Mode: Uses a traditional Q-table, suitable for problems with small, discrete state spaces.
- Neural Mode (DQN): Employs a Deep Q-Network (a neural network) to approximate Q-values. This approach overcomes the "curse of dimensionality" inherent in tabular methods, allowing the agent to handle large or continuous state spaces by learning a function that estimates Q-values. The DQN takes a numerical representation of the state as input and outputs estimated values for each possible action.
The key advantage of DQN is its ability to generalize: it can estimate values for states it hasn't seen before based on similarity to experienced states. However, it requires careful state preprocessing (converting raw state information into numerical vectors) and can be more complex to train and tune compared to the simple tabular method. The notebook provides a thorough explanation of both modes, their trade-offs, and a practical example, serving as another valuable educational resource within this repository.
To bridge theory and practice, we've implemented the DQN within a sophisticated system called RL Meta RAG (detailed in notebook). This system acts as an intelligent orchestrator, using the DQN agent to dynamically choose the most suitable RAG technique (like Llama Index, HyDE, Adaptive RAG and more...) for any given user query. The agent's 'state' is derived from features extracted from the query itself using an LLM, allowing it to learn an optimal selection policy over time. This practical application demonstrates how DQN can optimize complex decision-making processes, such as selecting the best information retrieval strategy based on experience.
By fusing these potent fetaures, AutoCodeAgent transforms intricate challenges into innovative, actionable solutions, setting a new standard in intelligent automation and advanced research.
Application Setup
Step-by-step guide to setting up the project for the first time.
AutoCodeAgent provides flexible integration with Large Language Models (LLMs) through both local and cloud-based solutions.
Our agentic framework can communicate with LLM models in two ways:
-
Local Integration: Using Ollama to run models directly on your machine using our prebuilt Docker container.
- Supports running LLM models locally through Ollama integration
- Pull and run models directly on your machine by prefixing model names with
local_in params.py (e.g.,local_deepseek-r1,local_llama3.3,local_phi4) - Automatically handles model downloading and initialization when specified models aren't already active
- Supports running models even without GPU by switching to CPU (with reduced performance)
- Customize parameters like temperature, top_p, top_k, and other inference settings on a per-model basis
-
Cloud Services: Connecting to OpenAI's API for access to their hosted models
For detailed information about cloud and local model management, please refer to the complete documentation at models/README.md
IntelliChain sections
Introduction to IntelliChain
This section provides a general overview of IntelliChain mode, its goals, and its main features.
Features
Here, the main features of the project are listed and described.
All Ways to Add Custom Tools
This section explains the various methods available for adding tools to the project.
Video Demo
Explore the full potential of AutoCodeAgent by watching these demonstration videos.
Parameters
Description of the parameters to use in CodeAgent constructor.
Default Tools
Description of the tools that are included by default in the project.
LangChain Tools
LangChain tools are integrated in the project, in this section you will learn how to add them easily.
SurfAi Integration
Integration of SurfAi as an Automated Web Navigation Tool (local function type)
We have integrated SurfAi into our suite as a powerful automated web navigation tool. This enhancement enables seamless interaction with web pages, efficient extraction of data and images, and supports the resolution of more complex tasks through intelligent automation.
Computer use openAi integration
We integrated a Computer-Using Agent (CUA) tool in Intellichain to automate computer interactions such as clicking, typing, and scrolling. The tool leverages OpenAI's visual understanding and decision-making to navigate browsers or virtual machines, extract and analyze data and images. It provides real-time updates and screenshots via WebSocket, streamlining web navigation and data extraction tasks. This integration enhances workflow efficiency significantly.
It operates similarly to Surf-ai but offers enhanced capabilities with a higher success rate for completing tasks.
Deep Search sections
Introduction to Deep Search
Deep Search – Dive Deeper, Discover More.
Multiagent collaborative chain
In these sections, you will understand how the agent planner generates a series of subtasks, each managed by a specialized agent interconnected with other agents in a collaborative network.
Data Extraction
Harnessing Real-Time Web Data and Structured Llama Index Local Knowledge.
Evolving Graph of Thought (EGOT): An Innovative Reasoning System
Dynamic Knowledge Representation for Adaptive Intelligence using an evolving graph of thought.
Multi-Level Deep Search: 5 Layers of Search Depth
A Progressive Approach to In-Depth Information Retrieval.
Human-in-the-Loop: Collaborative Inquiry and Feedback
Augmenting AI with Human Expertise for Enhanced Intelligence.
Video Demo And Prompts Examples
Explore the full potential of Deep Search by watching these demonstration videos.
Parameters and Configuration
Description of the parameters to use in Deep Search constructor.
Multi-RAG sections
All RAG Techniques
AutoCodeAgent 2.0 dynamically integrates multiple RAG techniques within the Intellichain subtask code generation process. This dynamic integration enables the agent to seamlessly switch between methods tailored for different data ingestion and retrieval challenges—whether it's processing direct chat inputs, executing automated subtasks, or handling batch document uploads.
By embedding these techniques as dynamic tools, the system automatically selects the most efficient approach based on the specific task, ensuring a streamlined and adaptive workflow. This allows for effective interaction with both structured and unstructured data, optimizing the retrieval process regardless of the data format or complexity.
In addition to their operational benefits, these RAG techniques serve as valuable educational resources. Detailed Jupyter Notebook (.ipynb) files are provided for each method, offering comprehensive explanations, practical code examples, and insights into the underlying concepts. This didactic component makes it easy for users to learn and experiment with each technique, bridging the gap between theoretical understanding and real-world application.
In essence, AutoCodeAgent 2.0 not only enhances data processing through its dynamic, integrated RAG tools but also empowers users with the knowledge to master advanced data ingestion and retrieval techniques.
Dive into this section and explore each technique step by step!
Application Setup
Follow the steps below to set up and run the application using Docker.
This setup ensures that all necessary services are built and started correctly.
Prerequisites
- Docker: Ensure that Docker is installed on your system. You can download it from here.
- Docker Compose: Typically included with Docker Desktop installations. Verify by running
docker-compose --version.
Steps to Initialize the Application
- Clone the repository:
git clone https://github.com/samugit83/AutoCodeAgent2.0-
Navigate to the project directory:
cd AutoCodeAgent2.0 -
Environment Variables:
Create a file named .env in the root folder and insert all the following variables to ensure the application functions correctly:
OPENAI_API_KEY=your_api_key
FLASK_PORT=5000
NEO4J_URI=bolt://neo4j:7687
NEO4J_USER=neo4j
NEO4J_PASSWORD=your_password
REDIS_HOST=redis
REDIS_PORT=6379
REDIS_DB=0

[email protected] # Gmail user for default tool send_email
PASSGMAILAPP=your_password # Gmail app password for default tool send_email

ELEVEN_API_KEY=API_KEY # elevenlabs api key for langchain tool
OPENWEATHERMAP_API_KEY=API_KEY # openweathermap api key for langchain tool
SERPAPI_API_KEY=API_KEY # serpapi api key for langchain tool and also deep search mode
SERPER_API_KEY=API_KEY # serpapi api key for deep search mode (optional, the script use serpapi by default)-
File params.py
Theparams.pyfile contains a comprehensive configuration dictionary that controls the behavior of AutoCodeAgent 2.0's various RAG (Retrieval-Augmented Generation) systems and tools. This configuration file centralizes all adjustable parameters, making the system highly customizable.
Additionally, it configures database paths for various vector stores (ChromaDB, LlamaIndex), email functionality credentials, and specifies which AI models to use for different components of the system (tool assistance, planning, evaluation, web automation, and search).
You can set which models to use throughout the system - whether cloud-based models from OpenAI or local models running through Ollama or any other API-compatible service. Models can be specified by prefixing with "local_" for local models (e.g., "local_llama3") or using the standard model name for cloud services (e.g., "gpt-4o").
This centralized configuration allows users to set the system's behavior by adjusting parameters without modifying core code. -
Build the Docker image:
docker-compose build -
Run the Docker container:
docker-compose up -d -
Check the backend logs:
docker logs -f flask_appIf you want to rebuild and restart the application, and optimize docker space:
docker-compose down
docker-compose build --no-cache
docker-compose up -d
docker builder prune -a -f
docker logs -f flask_app
If your goal is to recover disk space completely, you might consider removing all stopped containers, unused images, and unused volumes.
Be careful with these commands, as they will remove data that isn't currently in use.docker system prune -a docker volume prune
Is a good idea to always check docker space usage after building and starting the application:
docker system df - Access the AI Agent chat interface:
http://localhost:5000
9. To view the automated browser sessions (powered by SurfAi), open:
```bash
http://localhost:6901/vnc.html- To explore and interact with the Neo4j graph database, visit:
http://localhost:7474/browser/
Backend entry point
The backend logic is managed by a Flask application. The main Flask app is located at:
/app.pyThis file orchestrates the interaction between the AI agent, tool execution, and the integration of various services (like Neo4j, Redis, and Docker containers).
Frontend chat interface
The frontend static files (HTML, CSS, JavaScript, and images) reside in the folder:
/staticThese files serve the user interface for the AI chat and related functionalities.
IntelliChain
Introduction to IntelliChain
Welcome to the AutoCodeAgent IntelliChain Mode! This intelligent agent leverages cutting-edge AI techniques to automatically generate, execute, and refine Python code in a modular and iterative way. It is designed to break down complex tasks into manageable subtasks, generate precise code for each, and orchestrate their execution using a variety of tools and libraries.
The Advanced AI Code Agent is an AI-powered system that automates the process of decomposing complex problems, writing Python code, executing that code, and evaluating the results. It uses a combination of AI language models, dynamic code execution, and an evaluation loop to refine its approach until the task is successfully completed. This repository provides a robust framework that you can extend to solve a wide range of problems by simply defining new tasks and integrating appropriate tools.
IntelliChain allows you to handle complex tasks such as:
-
"I want to review the picture on Wikipedia for three different actors. Use browser_navigation to visit each actor's Wikipedia page, please use your vision capability guess the actor's age in the picture. Your goal is to guess the actor's age in the picture. Then, create a summary when you compare the picture age with the actual actor's age. Once you have completed the report, send it by email to (your_email). The actors are: Brad Pitt Robert De Niro Marlon Rando. Good luck!"
-
"Navigate with browser different electronics e-commerce sites to get the average price of the top 3 search results for the query: iPhone 13 Pro. The websites are: https://www.bestbuy.com/, https://www.croma.com/, https://www.mediaworld.it/, https://www.boulanger.com/. Then, provide me with a price comparison report. If you find a currency other than the euro, search Google for the latest exchange rate and convert the prices. Finally, save the report in the llama index database and send me the same report via email to (your_email)"
-
"Go to LinkedIn Feed and log in using your email (your_email) and password (your_password). Scroll down to the first post and leave a comment that is both intelligent and contextually relevant, taking into account the text and image. Your comment must contain at least 40 words. Once you have posted your comment, email the execution result to (your_email)."
-
"Please visit Booking.com and search for a Hotel in Milan that is available from June 1st to June 10th. Extract the name and price of the first hotel in the result. Then save it on simple rag database, send an email to (your_email) with the hotel's name and price."
-
"Calculate the area of the triangle formed by Paris, Moscow, and Rome in square kilometers, and send me an email at [email protected] with the coordinates of the cities and the calculated area."
-
"Search for the latest news about Open AI, summarize it and send me an email at [email protected] with the summary."
-
"Search for the latest articles on cybersecurity, extract full-page content along with any notable images and captions using your web search and browser navigation tools, compile everything into an HTML report, and send it via email to my team at [email protected] with the subject 'Cybersecurity Trends Update'."
-
"Search for the latest news about the latest Ferrari model, summarize it, and save it in the LlamaIndex database. After that, make 3 different queries on the database to check if the information was stored correctly. Finally, send me a report by email to [email protected]"
AutoCodeAgent introduces RAG (Retrieval-Augmented Generation) capabilities, empowering the system with multi RAG techniques, each having its own ingestion and retrieval tools.
The system uses many persistent Database integrated in Docker, like Vector ChromaDB, Graph Neo4j, and Others.
The great potential of this agent lies in its ability to use many RAG techniques as tools for both ingestion and retrieval.
For example, to save a web search in the database, simply create the prompt specifying the tool, such as: search for the latest news on Elon Musk and save it in the database using the tool: "ingest_hybrid_vector_graph_rag_db"
or, find information on the latest Ferrari model in the database using the tool "retrieve_simple_rag"
With these enhancements, the agent can now:
-
RAG Ingestion
Save structured or unstructured data into a database in a conversational manner, making it accessible for future tasks.
Dynamically analyze and preprocess data before ingestion, ensuring high compatibility with retrieval tools. -
RAG Retrieval
Efficiently retrieve relevant information from the database based on context, enabling informed decision-making and more accurate code generation.
Seamlessly integrate retrieved data into ongoing tasks, ensuring continuity and adaptability.
These features allow the agent to leverage previously ingested knowledge and improve task performance, particularly in scenarios requiring iterative learning or contextual awareness.
Features
Task Decomposition:
Automatically breaks down a complex main task into multiple smaller subtasks. Each subtask corresponds to a specific tool or function designed to handle a part of the problem, resulting in a clear and structured JSON plan.
Dynamic Code Generation & Execution:
For each subtask, the agent:
Generates Python code tailored to solve that specific subtask.
Executes the code to obtain outputs.
Feeds the output of one subtask as the input for the next, ensuring seamless data flow across the entire process.
Flexible Tool Creation:
Library-Based Tools: Easily integrate Python libraries by specifying their names and usage examples. The agent can automatically generate code that leverages these libraries.
Custom Function Tools: Define specific functions as tools. The agent identifies these and avoids auto-generating code for them, ensuring custom implementations remain intact and reliable.
LangChain Tools:
We have now integrated LangChain's toolbox, providing direct access to over 130 pre-built tools simply by specifying the tool name.
This powerful integration streamlines the process of incorporating new functionalities into your projects.
Iterative Evaluation Loop:
A dedicated Evaluation Agent monitors execution logs, assesses success, and, if necessary, re-plans or regenerates subtasks until a satisfactory result is achieved.
Memory Logging & Error Handling:
Integrates a robust logging system to capture detailed execution logs. This allows for precise debugging and refinement of the agent's behavior.
Each subtask function includes error handling with try/except blocks to ensure graceful failure and informative logging, making the agent resilient to runtime issues.
Modular and Extensible Design:
The framework encourages reusability and modularity by consolidating related operations within single functions when multiple subtasks require the same library. This maintains code efficiency and cleanliness.
Designed to integrate seamlessly with various Python libraries, allowing for flexible tool expansion without significant modifications to the core agent logic.
Safe and Secure Execution:
Uses controlled namespaces and captures standard output to prevent unintended side effects.
Python Function Validation & Task Regeneration:
A function validator inspects each subtask's code (via AST analysis) for syntax, dangerous constructs, parameter correctness, allowed libraries and other issues before execution. If validation or execution errors occur, the agent automatically regenerates the subtask to ensure successful task completion.
RAG retrieval / ingestion
- The agent now uses a vector database (ChromaDB) to store and retrieve information.
- Rag retrieval and Rag ingestion have been added as actual tools in code_agent.tool_generator.py
- About RAG retrieval: always ensure to instruct the agent to acquire information from the database.
Example prompt: "Retrieve information about Lamborghini from the database, translate it into German, and send it via email to [email protected]" - About RAG ingestion: always ensure to instruct the agent to ingest information into the database.
Example prompt: "Search for information about the Ducati Monster on the web and save it in the database"
Example prompt: "Save in the database the following information about the Ferrari F340: paste here the informations....."
Persistent Database
- At Docker startup, all support databases for any RAG technique, including vector databases (ChromaDB) and graph databases (Neo4j), are automatically created.
- The database is stored in the container, so it is persistent and will be available even after the container is stopped.
All Ways to Add Custom Tools
In addition to the default tools, users can create custom tools by describing the function and specifying the libraries to be used.
You can manage custom tools in the file /tools/custom_tools.py.
There are several ways to create custom tools:
-
ONLY LIBRARY NAME:
specifying only the name of the Python library:
Ensure the library is listed in requirements.txt{ "tool_name": "numpy", "lib_names":["numpy"], "type": "standard_custom" } -
LIBRARY NAME + INSTRUCTIONS + CODE EXAMPLE:
specifying a python library, providing a description, and a non-strict code example:
Ensure the library is listed in requirements.txt{ "tool_name": "geopy", "lib_name": ["geopy"], "type": "standard_custom", "instructions": "A library to get the coordinates of a given location.", "code_example": """ def get_coordinates(previous_output): from geopy.geocoders import Nominatim updated_dict = previous_output.copy() user_agent = "my-app/1.0" location = updated_dict.get("location", "") geolocator = Nominatim(user_agent=user_agent) try: # Geocode the location geo_location = geolocator.geocode(location) if geo_location: updated_dict["coordinates"] = (geo_location.latitude, geo_location.longitude) else: updated_dict["coordinates"] = None return updated_dict except Exception as error: logger.error(f"Error retrieving coordinates: {error}") return previous_output """ }
3) **LIBRARIES + INSTRUCTIONS + STRICT CODE EXAMPLE**:
defining a precise custom function associated with one or more libraries:
By adding use_exactly_code_example: True, the code will be executed exactly as written, without any modifications. In the absence of this parameter, the code will be modified by the agent based on the task requested by the user. The second solution is more versatile but should only be applied to functions that do not require code modification.
If the function you add is already complex and very specific with possible critical issues, it is recommended to use the use_exactly_code_example: True mode.
```python
    {
        "tool_name": "send_email",
        "lib_names": ["smtplib", "email"],
        "type": "standard_custom",
        "instructions": "Send an email to the user with the given email, subject and html content.",
        "use_exactly_code_example": True,
        "code_example": """
def send_email(previous_output, GMAILUSER: str = "[email protected]", PASSGMAILAPP: str = "your_password") -> dict:
    import smtplib
    from email.mime.text import MIMEText
    from email.mime.multipart import MIMEMultipart

    # Gmail credentials
    usermail = GMAILUSER
    passgmailapp = PASSGMAILAPP

    # SMTP server configuration
    smtp_server = "smtp.gmail.com"
    port = 587  # For TLS encryption

    try:
        updated_dict = previous_output.copy()

        # Create the email message
        message = MIMEMultipart()
        message["From"] = usermail
        message["To"] = updated_dict.get("email", "")
        message["Subject"] = updated_dict.get("subject", "")

        # Attach the HTML content
        html_content = updated_dict.get("html", "")
        if html_content:
            message.attach(MIMEText(html_content, "html"))

        # Establish connection to the SMTP server
        with smtplib.SMTP(smtp_server, port) as server:
            server.starttls()  # Secure the connection
            server.login(usermail, passgmailapp)  # Log in to the SMTP server

            # Send the email
            server.sendmail(usermail, updated_dict.get("email", ""), message.as_string())
            logger.info(f"Email sent to {updated_dict.get('email', '')} with subject {updated_dict.get('subject', '')}")

        updated_dict["info"] = "Email sent successfully"
        return updated_dict
    except Exception as error:
        logger.error(f"Error sending email: {error}")
        return previous_output
"""
}-
Add tools such as LLMs for support:
{ "tool_name": "helper_model", "lib_names": ["models"], "type": "standard_custom", "instructions": "An LLM useful to elaborate any output from previous steps. Don't create loops, just use the LLM to elaborate the output for a single step.", "use_exactly_code_example": True, "code_example": """ def call_helper_model(previous_output): from models.models import call_model try: updated_dict = previous_output.copy() message = updated_dict.get('message', '') if len(message) > 350000: message = message[:350000] updated_dict['message'] = message prompt = f"here you describe how to elaborate the previous output: {updated_dict.get('message','')}" llm_response: str = call_model( chat_history=[{"role": "user", "content": prompt}], model="$TOOL_HELPER_MODEL" ) updated_dict["elaborated_output"] = llm_response return updated_dict except Exception as e: logger.error(f"Error calling helper model: {e}") return previous_output """ } -
ADD LOCAL FUNCTIONS:
adding a local function to the agent, we use this technique to add RAG retrieval and RAG ingestion as tools:{ "tool_name": "ingest_hybrid_vector_graph_rag", "lib_names": ["tools.rag.hybrid_vector_graph_rag"], "type": "standard_custom", "instructions": "This is an Hybrid Vector Graph RAG ingestion tool. Ingest the text into the vector and graph database.", "use_exactly_code_example": True, "code_example": """ def ingest_hybrid_vector_graph_rag_db(previous_output): from tools.rag.hybrid_vector_graph_rag.engine import HybridVectorGraphRag try: updated_dict = previous_output.copy() engine = HybridVectorGraphRag() text: str = updated_dict.get("text", "") ingest_result: dict = engine.ingest([text]) updated_dict["ingest_result"] = str(ingest_result) return updated_dict except Exception as e: logger.error(f"Error ingesting texts: {e}") return previous_output """ }
To add new tools, simply insert them into the tools array in app.py.
Some rules to follow:
-
The tool name (tool_name) must be unique.
-
Use exactly the same JSON structure you see, for example, for geopy.
-
Add default parameters in the function parameters only if you need fixed values to use in the function
-
Add the type "standard_custom"
-
Always use typing for all variables that interact with updated_dict, both in get and set, for example:
# set new_variable_1: str = "new_value_1" updated_dict["new_variable_1"] = new_variable_1 # get new_variable_2: str = updated_dict.get("new_variable_1", "") -
For the function, always use this schema:
def function_name(previous_output):

  from library_name import method_name
  updated_dict = previous_output.copy()
  # some variables here

  try:
      # add your logic here
      # remember to always update updated_dict based on what the function returns
      # for example: updated_dict["new_variable_1"] = "new_value_1"
      # for example: updated_dict["new_variable_2"] = "new_value_2"
      # always specify the type for the outputs of the library functions used, for example: answer: str = method_name(args)

      return updated_dict

  except Exception as error:
      logger.error(f"Error for the function_name: {function_name} : {error}")
      return previous_output
Video Demo
Discover the capabilities of AutoCodeAgent with those videos:
Project explanation Video Demo.
Hybrid Vector Graph RAG Video Demo.
Integration with SurfAi Video Demo 1.
Integration with SurfAi Video Demo 2.
Integration Open AI Computer use automation.
Reinforcement Learning and RL Meta RAG
Parameters
chat_history: list of dictionaries, each containing a message history.
{
    "role": "user" | "assistant",
    "content": "message content"
}tools: list of dictionaries, each containing a custom tool defined by the user.
use_default_tools: boolean, if True, the default tools will be included in the list of tools.
code_agent = CodeAgent(
    chat_history=chat_history,
    tools=tools,
    use_default_tools=True
)
Default Tools
The default tools are pre-implemented and fully functional, supporting the agent in executing subtasks.
These default tools are listed below and can be found in the file:
/code_agent/default_tools.py
- browser_navigation_surf_ai
- integration of SurfAi for web navigation, data and image extraction, with multimodal text + vision capabilities
- browser_navigation_cua
- Computer-Using Agent (CUA) that automates computer interactions like clicking, typing, and scrolling. Leverages OpenAI's visual capabilities to navigate interfaces, extract data, and provide real-time feedback.
- helper_model
- An LLM useful for processing the output of a subtask
- helper_model_web_search
- This new tool provided by OpenAI responds to your requests with information retrieved from the web in real-time.
- ingest_simple_rag
- A tool for ingesting text into a ChromaDB Vector database with simple RAG
- retrieve_simple_rag
- A tool for retrieving the most similar documents to a query from a ChromaDB Vector database with simple RAG
- ingest_llama_index
- A tool for ingesting text into a LlamaIndex vector database
- retrieve_llama_index
- A tool for retrieving the most similar documents to a query from a LlamaIndex vector database
- ingest_hybrid_vector_graph_rag
- A tool for ingesting text into a Neo4j database with hybrid vector graph RAG
- retrieve_hybrid_vector_graph_rag
- A tool for retrieving the most similar documents to a query from a Neo4j database with hybrid vector graph RAG
- retrieve_hyde_rag
- A tool for retrieving the most similar documents to a with the HyDe RAG technique
- retrieve_adaptive_rag
- A tool for retrieving the most similar documents to a with the Adaptive RAG technique
- web_search
- A tool for searching information on the web
- send_email
- A tool for sending an email
To include the default tools in the list of tools, set the parameter use_default_tools to True in the CodeAgent constructor.
If you have set use_default_tools to True, you can enable or disable specific tools by modifying the TOOLS_ACTIVATION variable in the default_tools.py file.
SurfAi Integration
🌐🤖 AI-Powered Web Automation Agent
SurfAi is an intelligent and lightweight web automation engine that harnesses AI to interpret natural language instructions and automate web interactions using Playwright. It seamlessly integrates large language model capabilities with browser automation to execute complex tasks.
The groundbreaking innovation lies in its integration as a tool within AutoCodeAgent, enabling the execution of even more sophisticated tasks. SurfAi allows users to navigate web pages, interact with them, extract information, and visually analyze images, ultimately delivering a structured output for the next tool in the complex task workflow.
Video Demo
Discover the capabilities of SurfAi:
Task: Post on Linkedin
Task: Job application on LinkedIn
Task: Add a new work experience on LinkedIn
Task: Search for an available hotel on Booking.com and get info
Features ✨
- AI-Driven Task Generation: Converts natural language prompts into executable Playwright commands
- Self-Correcting Workflow: Dynamic task adjustment based on execution results and page context
- Interactive Element Highlighting: Visual numbering system for precise element targeting
- Multi-Strategy Execution: Automatic fallback commands for reliable task completion
- Context-Aware Scraping: Real-time page analysis with intelligent content truncation
- Comprehensive Logging: Detailed execution tracking with memory buffering
- Data Extraction: Extract data from the page and store it in the tasks to provide a final answer
- Multi-Tab Navigation: Navigate on multiple tabs and switch between them
If the tool is invoked, you can view the navigation by accessing:
http://localhost:6901/vnc.htmlYou can find the screenshots generated during navigation at the following path: /tools/surf_ai/screenshots
Important: To avoid confusion for the planner agent in Intellichain, activate only one browser automation tool at a time.
In the default_tools.py file, set these parameters:
    "browser_navigation_surf_ai": True,
    "browser_navigation_cua": False,
Computer use openai integration
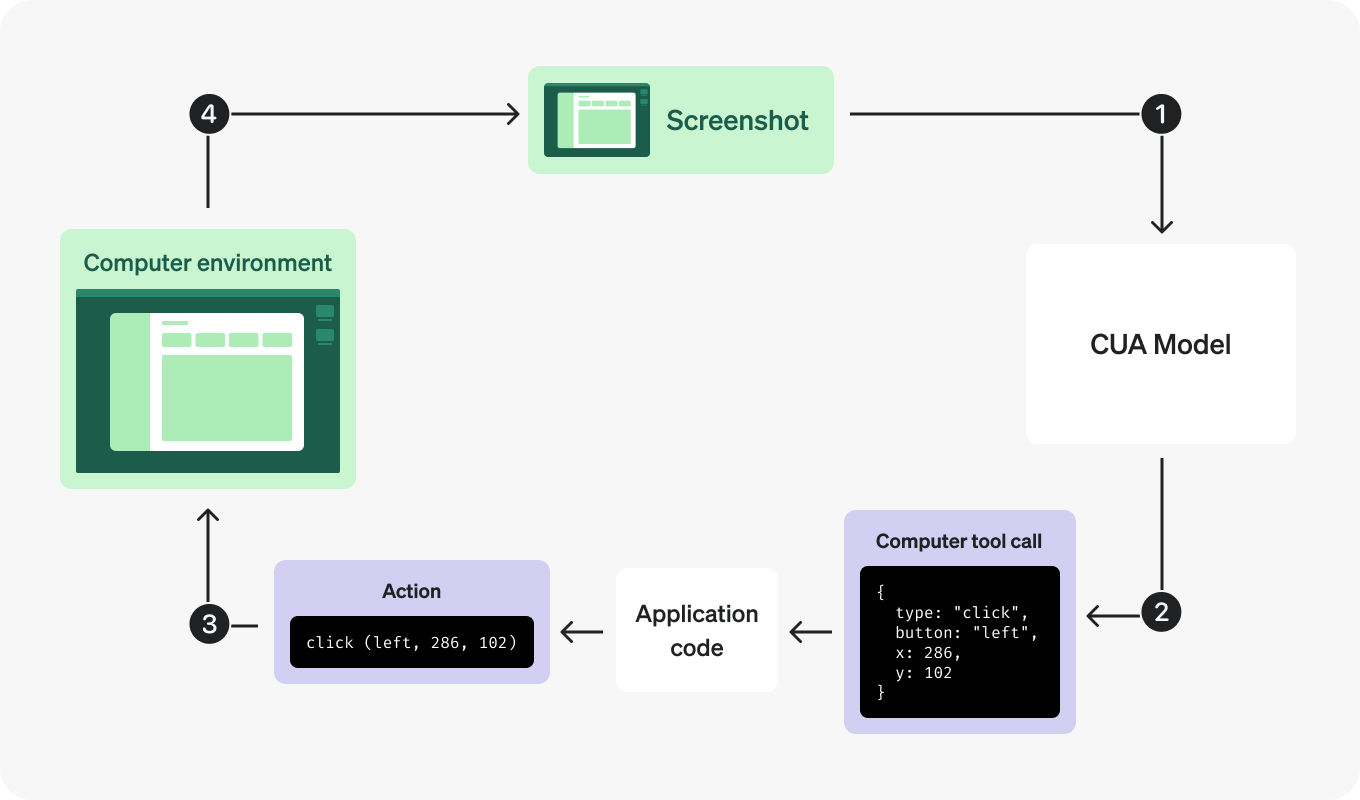
OpenAI's Computer-Using Agent (CUA) automates computer interactions like clicking, typing, and scrolling. It leverages visual understanding and intelligent decision-making to efficiently handle tasks typically performed manually.
The tool doesn't just navigate and interact with web pages, but also engages with the user through chat, requesting additional instructions whenever it encounters problems or uncertainties during navigation.
Integration Overview
CUA integration involves a feedback loop:
- Setup the Environment (Browser or Virtual Machine).
- Send Initial Instructions to the CUA model.
- Process Model Responses for suggested actions.
- Execute Actions within your environment.
- Capture Screenshots after actions.
- Repeat until task completion.
Video Demo
Open Ai Computer use automation.
For CUA integration, we've implemented a default tool called browser_navigation_cua which is available in the default_tools.py file. This tool enables automated browser navigation and interaction with web content through OpenAI's Computer-Using Agent capabilities.
    {
        "tool_name": "browser_navigation_cua",
        "lib_names": ["tools.cua.engine", "asyncio"],
        "instructions": ("This is an agent that automates browser navigation. Use it to interact with the browser and extract data during navigation.\n"
                         "From the original prompt, reformulate it with input containing only the instructions for navigation, vision capablity and text data extraction.\n"
                         "It also has visual capabilities, so it can be used to analyze the graphics of the web page and images.\n"
                         "For example: \n"
                         "Initial user prompt: use the browser navigator to go to Wikipedia, search for Elon Musk, extract all the information from the page, and analyze with your vision capability his image, and send a summary of the extracted information via email to [email protected]\n"
                         "Input prompt for browser navigation: go to Wikipedia, search for Elon Musk, extract all the information from the page, and analyze with your vision capability his image.\n"
                         "**Never forget important instructions on navigation and data extraction.**"),
        "use_exactly_code_example": True,
        "code_example": """
def browser_navigation_cua(previous_output):
    import asyncio
    from tools.cua.engine import CUAEngine

    try:
        updated_dict = previous_output.copy()

        prompt: str = updated_dict.get("prompt", "")
        cua_engine = CUAEngine(prompt, session_id, socketio)
        final_answer_message: str = asyncio.run(cua_engine.run())
        updated_dict["result"] = final_answer_message
        return updated_dict
    except Exception as e:
        logger.error(f"Error browser navigation: {e}")
        return previous_output
"""
    },
Important: To avoid confusion for the planner agent in Intellichain, activate only one browser automation tool at a time.
In the default_tools.py file, set these parameters:
    "browser_navigation_surf_ai": False,
    "browser_navigation_cua": True,
Thanks to the integrated WebSocket, during navigation phases you'll see real-time updates in the chat with all actions performed by the agent on web pages.
The agent thinks intelligently and critically about various pages, and if it encounters problems, it communicates in the chat requesting clarification or additional information to complete a navigation task.
If the tool is invoked, you can view the navigation by accessing:
http://localhost:6901/vnc.htmlYou can find the screenshots generated during navigation at the following path: /tools/cua/screenshots
To use this tool, make sure you have added your OPENAI_API_KEY in the .env file
For technical documentation on OpenAI's API integration, please refer to:
https://platform.openai.com/docs/guides/tools-computer-use
LangChain Tools
We have now integrated LangChain's toolbox, providing direct access to over 130 pre-built tools simply by specifying the tool name.
This powerful integration streamlines the process of incorporating new functionalities into your projects.
How to Add LangChain Tools
To add a LangChain tool, include an object with the following attributes in the initial tools array (alongside your standard_custom tools):
{
  "langchain_tool_name": "serpapi",
  "type": "langchain_tool",
  "additional_parameters": {
    "param_a": "param_a_value"
  }
}- langchain_tool_name: Must exactly match the tool name as specified in the LangChain Tools Documentation.
- type: Should always be set to langchain_tool.
- additional_parameters: Contains any extra parameters required by the specific tool (for example, an API key). Although you can provide parameters here, it is recommended to store sensitive information like API keys in the .env file based on the tool's requirements.
Important Considerations
- Additional Libraries: Some LangChain tools require extra libraries (e.g., elevenlabs, google-serp-api). Consult the LangChain Tools Documentation for details on which libraries to install, the necessary additional parameters, and the required environment variables.
- Requirements Update: When integrating a new LangChain tool that requires extra libraries, add these libraries to your requirements.txt. After updating, you must rebuild the Docker image and restart the container from scratch. Please refer to the Application Setup section for instructions on restarting Docker.
LangChain tools are extremely powerful for tackling complex tasks. For instance, consider a prompt that leverages the combined capabilities of different tools:
Example Prompt:
Generate a single audio file simulating a TV host presenting weather forecasts for the cities of Rome, Florence, and Venice. The script should include segments in English, Italian, and French, in that order, and consist solely of spoken text intended for playback.
In this example, the system would:
- Use openweathermap-api to fetch the weather forecasts.
- Employ helper_model to construct a script that seamlessly transitions between English, Italian, and French.
- Utilize eleven_labs_text2speech to convert the script into a cohesive audio file, perfect for a TV broadcast simulation.
This demonstrates the flexibility and strength of LangChain's integration capabilities in orchestrating multiple tools to achieve a complex, multi-step task.
Deep Search
Introduction to Deep Search
Deep Search is the cornerstone of our agent's advanced analytical capabilities. This mode enables the system to go beyond surface-level queries by combining real-time web data acquisition with local database integrations, such as the Llama Index. It leverages state-of-the-art data extraction techniques and contextual analysis to produce actionable, in-depth reports that transform raw data into operational intelligence.
Deep Research accomplishes in minutes what would typically require hours of human effort. By providing a simple prompt, users can unleash an autonomous agent that searches, analyzes, and synthesizes information from hundreds of online sources, creating comprehensive reports at the caliber of a seasoned research analyst.
Deep Search employs advanced reasoning to interpret massive volumes of text, images, and PDFs. This enables the system to dynamically pivot its search strategy based on newly discovered data, ensuring that every facet of a query is thoroughly explored. At its core, Deep Search integrates multiple sources of information through a robust agent chain that coordinates tasks using innovative methods like the Evolving Graph of Thought (EGOT). This system not only captures the relationships between data points in a dynamic graph but also continuously refines its search strategy by incorporating feedback from both automated processes and human oversight. The multi-agent planner orchestrates a series of subtasks—from web scraping and RAG-based document retrieval to comprehensive data synthesis—ensuring that the final report is coherent, detailed, and scientifically grounded.
In summary, Deep Search represents a significant leap toward the development of Artificial General Intelligence (AGI), with its ability to synthesize existing knowledge to create new insights. It empowers users by transforming the exhaustive process of online research into a streamlined, efficient, and reliable workflow, ultimately providing actionable intelligence that supports strategic decision-making.
Multiagent collaborative chain
The Multiagent Collaborative Chain is the backbone of our system's approach to tackling complex research and problem-solving tasks. It orchestrates a group of autonomous AI agents, each responsible for a distinct subtask, that collaboratively work together to produce a comprehensive final output. In this section, we will explain in detail how the JSON chain is created, how each agent in the chain collaborates with one another, and the inner workings of the multiagent system as implemented in our DeepSearchAgentPlanner class.
At its core, the multiagent collaborative chain divides a complex user prompt into smaller, manageable subtasks. Each subtask is assigned to a dedicated AI agent. These agents generate outputs based on a well-defined JSON chain that acts as a blueprint for the entire process. The JSON chain contains key attributes for each agent such as:
- agent_nickname: A unique identifier for the agent.
- agent_llm_prompt: The detailed prompt that guides the agent's specific subtask.
- input_from_agents: An array listing the nicknames of other agents whose outputs are needed as inputs.
- user_questions: A list of clarifying questions for the user to ensure that the generated output is accurate and contextually relevant.
- external_search_query: (Optional) A specific query designed to fetch real-time or specialized information from external sources.
- output_type: This indicates whether the output is "functional" (supporting further processing) or "final" (contributing directly to the final answer).
This structure ensures that each agent works in a coordinated manner, with outputs from one agent feeding into another when necessary, culminating in a well-structured, aggregated final result.
How the Collaborative System Works
The multiagent collaborative chain is not a linear pipeline; it is a dynamic and interactive system where agents communicate, share information, and build upon each other's work. Here's a step-by-step explanation of how this collaboration unfolds:
Initial Prompt and JSON Chain Generation:
The process begins with a user prompt. The system uses the SYSTEM_PROMPT_AGENT_PLANNER to instruct the language model on how to decompose this prompt into a series of subtasks. The output is a JSON chain that clearly defines the roles and responsibilities of each agent.
Agent-Specific Subtask Execution:
Each agent receives a unique prompt tailored to its task. For instance, one agent might focus on market analysis while another concentrates on operational planning. The key here is that the output of one agent can serve as a crucial input for another. This dependency is explicitly defined in the input_from_agents field.
Incorporating External and Local Data:
As agents execute their tasks, they may require additional context. The system dynamically fetches external data via web searches or local database queries (using the Llama Index) and incorporates this information into the agent's prompt. This ensures that every agent operates with the most relevant and up-to-date data available.
Inter-Agent Communication via Observations:
Each agent's output is stored in the JSON chain under the observation attribute. Subsequent agents can access these observations, which serve as the foundational context for their own analysis. For example, if the Market Analysis agent produces a detailed report on competitor trends, the Marketing Strategy agent can leverage this output to develop targeted promotional plans.
Dynamic Graph of Thought (EGOT) Integration:
The integration of the EGOT (Evolving Graph of Thought) framework represents a fundamental feature that allows the system to generate more articulate and intelligent responses. When an agent completes its subtask, its output is used to update an evolving graph that maps not only the logical connections between various concepts, but also deeper contextual relationships. This dynamic graph serves as a "working memory" for the system, allowing it to:
- Maintain a structured representation of acquired information
- Identify patterns and connections that are not immediately evident
- Reason more sophisticatedly by integrating different levels of abstraction
- Generate original insights through analysis of relationships between nodes
- Progressively refine responses based on growing understanding of context
In this way, EGOT enables the model to process responses that go beyond simple information aggregation, producing deeper analyses and more articulate conclusions that reflect true understanding of the domain being examined.
User Interaction and Feedback:
Throughout the chain execution, the system may pause to collect additional input from the user. This "human in the loop" mechanism ensures that if any ambiguities arise or if additional clarifications are needed, the process can incorporate human feedback before proceeding further. This interactive element is vital for ensuring accuracy and contextual relevance in the final output.
Here you can find an example of the JSON chain in JSON format.
With a user prompt example like this: 'I want to start an e-commerce business. Can you help me structure all aspects of the company, including operational, marketing, and growth strategies to break even within 1 year and achieve at least $1,000,000 in revenue within 2 years? I would also like a detailed plan with market analysis, expense forecasts, customer acquisition strategies, and cost optimization.'
the LLM should generate a JSON chain like this:
{
  "agents": [
    {
      "agent_nickname": "MarketAnalysis",
      "agent_llm_prompt": "Conduct a comprehensive market analysis for a new e-commerce business aiming to break even within 1 year and achieve $1,000,000 revenue in 2 years. Include industry trends, target demographics, competitor analysis, and potential market size.",
      "input_from_agents": [],
      "user_questions": [
        "What specific products or services will your e-commerce business offer?",
        "Do you have a target geographic market?"
      ],
      "external_search_query": "e-commerce market analysis",
      "output_type": "functional"
    },
    {
      "agent_nickname": "OperationalPlanning",
      "agent_llm_prompt": "Develop an operational plan for the e-commerce business, including supply chain management, inventory management, order fulfillment, customer service, and technology infrastructure.",
      "input_from_agents": ["MarketAnalysis"],
      "user_questions": [
        "What platforms or technologies are you considering for your e-commerce site?"
      ],
      "output_type": "functional"
    },
    {
      "agent_nickname": "MarketingStrategy",
      "agent_llm_prompt": "Create a detailed marketing strategy for the e-commerce business, focusing on brand positioning, online marketing channels, content strategy, social media engagement, and advertising campaigns.",
      "input_from_agents": ["MarketAnalysis"],
      "user_questions": [],
      "output_type": "final"
    },
    {
      "agent_nickname": "ExpenseForecasting",
      "agent_llm_prompt": "Prepare an expense forecast for the e-commerce business for the next two years, including startup costs, operational expenses, marketing budgets, staffing costs, and other relevant expenditures.",
      "input_from_agents": ["OperationalPlanning", "MarketingStrategy"],
      "user_questions": [
        "What is your initial budget for starting the business?"
      ],
      "external_search_query": "e-commerce startup costs",
      "output_type": "functional"
    },
    {
      "agent_nickname": "CustomerAcquisition",
      "agent_llm_prompt": "Outline customer acquisition strategies for the e-commerce business, including customer acquisition cost (CAC) analysis, retention strategies, referral programs, and loyalty incentives.",
      "input_from_agents": ["MarketingStrategy"],
      "user_questions": [],
      "external_search_query": "e-commerce customer acquisition",
      "output_type": "functional"
    },
    {
      "agent_nickname": "CostOptimization",
      "agent_llm_prompt": "Identify opportunities for cost optimization within the e-commerce business operations, including bulk purchasing, automation tools, outsourcing, and process improvements.",
      "input_from_agents": ["ExpenseForecasting"],
      "user_questions": [
        "Do you prefer in-house operations or outsourcing certain functions?"
      ],
      "output_type": "final"
    },
    {
      "agent_nickname": "GrowthStrategy",
      "agent_llm_prompt": "Develop a growth strategy for the e-commerce business to scale operations, expand product lines, enter new markets, and increase revenue streams over the next two years.",
      "input_from_agents": ["OperationalPlanning", "CustomerAcquisition"],
      "user_questions": [
        "Are you considering international markets?"
      ],
      "output_type": "final"
    }
  ]
}
Data Extraction
This module is dedicated to the acquisition and aggregation of data from a wide range of heterogeneous sources. It is engineered to extract real-time information from the web while also integrating data from local databases powered by the Llama Index. By leveraging advanced web scraping, parsing algorithms, and optimized data structures, the system ensures that every piece of information is retrieved with high accuracy and relevance. This section details the inner workings of our data extraction process, the technologies involved, and the methodologies used to merge external and local data seamlessly.
Overview of the Data Extraction Process
The data extraction module is designed to be both robust and flexible. It supports the retrieval of information from dynamic web pages and static sources while integrating the results with locally stored data for rapid analysis. The key functionalities include:
-
Real-Time Web Data Acquisition
- The system is capable of performing live searches using powerful web search APIs
- Gathers information from various online sources
- Ensures that the latest and most relevant data is captured
-
Web Scraping and Parsing
- System uses web scraping tools to navigate to result pages and extract visible textual content
- Employs libraries like BeautifulSoup to strip away markup
- Isolates meaningful content from web pages
-
Data Truncation and Cleaning
- Extracted content can be truncated to predetermined maximum length
- Prevents processing of excessively long documents
- Helps maintain focus on critical information needed for analysis
-
Local Data Integration with Llama Index
- Supports retrieval from local databases alongside real-time web data
- Leverages Llama Index for structured and optimized data storage framework
- Enables rapid access and analysis of previously ingested data using the endpoint in app.py /llama-index-ingest-corpus
Evolving Graph of Thought (EGoT): An Innovative Reasoning System
The EGOT system is a novel reasoning framework that continuously builds and refines a graph structure representing the agent's thought process. In this system, nodes symbolize distinct concepts, insights, or intermediate results, and the edges denote the relationships or dependencies between these elements. This evolving graph of thought (EGOT) is central to achieving an integrated, dynamic, and interpretable synthesis of complex reasoning tasks.
Integration in the Agent Chain:
- Subtask Coordination: the EGOT engine is used within a multi-agent planning framework. Each agent in the chain is responsible for a subtask, and their outputs are not only aggregated into a JSON chain but are also visualized as nodes within the EGOT.
- Dynamic Mapping: When an agent completes a subtask, its output is processed to extract key concepts. The EGOT_GENERATION_PROMPT is used to generate an updated version of the evolving graph. The graph incorporates both new insights and previously established connections, ensuring that each subtask's contribution is accurately reflected.
- Graph Storage and Retrieval: The engine uses a Neo4j database to store nodes and edges. Each node is tagged with a dynamic label (derived from the session ID), allowing for session-specific visualization and evolution. Methods like create_node, create_edge, and get_graph support the creation and retrieval of the graph, while delete_graph ensures the graph can be reset when necessary.
Operational Flow:
- Prompt Generation: For each subtask agent, a specialized prompt is generated (via DIPENDENT_AGENT_PROMPT) that includes both the current subtask context and any relevant data from connected agents.
- Graph Update: After an agent produces its output, the system generates an additional prompt using EGOT_GENERATION_PROMPT. This prompt asks the model to interpret the new subtask output in the context of the current EGOT graph and the overall JSON chain.
- Graph Expansion: The resulting output, a structured JSON array, contains new nodes and defined relationships. The EGoTEngine.create_multiple_nodes_and_edges method then translates these definitions into concrete nodes and edges in the Neo4j graph, thereby updating the evolving graph of thought.
Enhanced Contextual Understanding:
- Interconnected Insights: By maintaining a graph that maps the relationships among concepts, EGOT ensures that every subtask's output is not seen in isolation. The system can trace how individual insights relate to the overall plan, enabling a more coherent synthesis in the final answer.
- Dynamic Reasoning: The graph is continuously updated as new information becomes available. This dynamic updating allows the agent to refine earlier assumptions and to adapt to new search results, which is especially valuable for deep search tasks where context can rapidly evolve.
Improved Traceability and Interpretability:
- Visualization of Thought Processes: The EGOT graph provides a visual trace of the reasoning process. This transparency not only aids debugging and system improvement but also allows for easier interpretation of the final answer generation process.
- Robust Decision-Making: By capturing dependencies between agents (via edges) and emphasizing the importance of each concept (through nodes), the system ensures that every intermediate result is logically integrated into the final decision-making process.
Efficient Integration of Multi-Source Data:
- External Search Integration: When agents incorporate external search results (e.g., web search or RAG outputs), the EGOT framework assimilates these data points into the graph. This means the final answer benefits from both internal reasoning and up-to-date external information.
- Structured Aggregation: The use of a JSON chain alongside the EGOT graph ensures that outputs from various agents (whether functional or final) are consistently integrated, supporting a structured and layered approach to answer generation.
Scalability in Complex Reasoning Tasks:
- Modular Expansion: As the number of agents or the complexity of tasks increases, the evolving graph structure scales to capture new relationships without losing the context of earlier reasoning. This modularity is critical for deep search scenarios where numerous interdependent factors must be considered.
Attributes of Nodes and Relations
Nodes
- Name: A concise label identifying the node.
- Entity Type: Categorizes the node (e.g., Person, Organization, Concept) to indicate what type of entity or idea it represents.
- Concept: Provides a detailed description of the node, drawn from the agent's output, to capture the essence of the idea or insight.
- Thought: Explains the significance of the node in the overall reasoning process, highlighting why it is essential to the evolving graph.
Relations (Edges)
- Relation: A short description that explains the connection between two nodes (e.g., "is a type of", "supports", "integrates with").
- From / To: These attributes identify the nodes that are being connected. For new nodes, the system uses their positional index; for existing nodes, it references their unique node IDs.
- From Node Type / To Node Type: These indicate whether the node was created in the current output ("new") or is part of the existing EGOT graph ("egot_graph").
This structured approach ensures that every piece of insight is precisely categorized and linked, making the overall reasoning process transparent and the final answer more robust.
Here you can find some examples of the EGOT graph in JSON format:
[
  {
    "name": "Central Hub",
    "entity_type": "Organization",
    "concept": "The main coordinating entity responsible for the project, integrating various sub-components and ensuring a cohesive strategy. It acts as the nucleus for planning and implementation, bridging communication gaps and orchestrating collaborative efforts among diverse teams.",
    "thought": "Represents the central authority that drives the overall plan and serves as a connection point between established structures and new insights. It is crucial for aligning various strategies and ensuring that both legacy systems and innovative approaches are harmoniously integrated to achieve project goals.",
    "relation": "integrates with",
    "from": 21,
    "from_node_type": "egot_graph"
  },
  {
    "name": "Tech Division",
    "entity_type": "Organization",
    "concept": "A specialized branch focusing on technological innovation and solutions, critical for implementing advanced strategies. It leverages cutting-edge technologies to solve complex problems and drive sustainable growth, continuously adapting to emerging trends.",
    "thought": "Highlights the importance of technical expertise and its collaboration with existing systems to achieve the project's innovative objectives. This division not only pioneers technological advancements but also serves as a catalyst for cross-functional integration and agile response to market changes.",
    "relation": "collaborates with",
    "from": 1,
    "from_node_type": "new",
    "to": 78,
    "to_node_type": "egot_graph"
  },
  {
    "name": "Market Analysis",
    "entity_type": "Process",
"concept": "A systematic examination of market trends, competition, 


